Tuesday, 24 February 2015

Personal action plan


Today I had a review from my tutors. It was quite positive however there are some issues that need to be sorted out I have divided these issues into sections and hopefully by recording these notes clearer I may refer back to them in the future.

In order to improve
  • I need to develop better observation skills in 2D and 3D mediums
  • I need to make my blog use less of a list format in terms of images and graphics


I will


  • Attempt to produce more master studies and still life’s as well as continue to attend extra life drawing (2D) and attempt to model in 2 planes of view rather than 1 (3D)

  • Annotate screenshots more via analytical text underneath and break up long lists of images with text and analysis


Chris Anka Web Developer

Morbi aliquam fringilla nisl. Pellentesque eleifend condimentum tellus, vel vulputate tortor malesuada sit amet. Aliquam vel vestibulum metus. Aenean ut mi aucto.

Monday, 23 February 2015

week 21


Week 21
This week for the character project I would say has been one of my most crackdown weeks so far. Looking back, I am quite proud of what I had managed to accomplish as I managed to model the clothing on top of my character early on in the week. In addition to this I was able to unwrap my character and texture him within the weekend,  thus giving me a nice week to get my head around rigging my character; something that still gives me the shivers.

On the other hand, all of this hard work came at a cost to my health as I managed to burn myself out at the end of the intensive texturing weekend.

Add caption

The model you see above is a screen cap of my model without its textures.  I managed to get this modelled in the first half of the week by extruding and cutting verts on my models mesh. Problem was, by doing this I created so many Ngons by the end of the modelling stage I spent a good half a day cleaning up the topology of my mesh. 

My Unwrap

When I did get to the eventual unwrap phase of my model, this admittedly felt like a breeze. (Tell that to my past self and he would disagree.) Anyway after unwrapping so many boxes, cylindrical and spherical forms. This unwrap process felt quite natural as I just applied basic knowledge of what I have learnt so far and adjusted it to the model as well as keeping in mind of hiding seams. I even attempted to experiment with 3d coat a tool which specialises in unwrapping. However I felt as weird as this sounds that I wanted to train myself more with 3ds maxes unwrapp tools as say if I am too reliant on 3d coat If I were to work at a company which doesn't own the software for lack of a better term I would be "buggered" .

James Gurney's theory


The last of the week I spent texturing intensively, starting on Friday evening and finishing on Sunday evening. Texturing this character felt more like problem solving than just flat out painting. One problem I had to get to grips with was using James Gurney's colour zone theory and having to apply it to someone of my decent and skin tone.

Colour zone texture for character

When attempting to use this on my model I found that I had to adjust the model so much changing the layer style to hue and turning down the saturation and opacity of the layer. It almost got me a bit down because when I did feel as If it wasn't working so much with my skin tone I attempted to find some alternative colour zones for different races and it seems there are no theories out there. This meant if and when I do want to paint other races I will need to really observe the colours within their portraits rather than relying on valuable information.


My texture
Another problem I came across was attempting to convey the look of plaid on my characters texture to convey his Scottish background. I spend hours on this constantly re iterating my texture to make sure it clearly communicates said look.


It eventually got to the point in which I watched a DIY painting video on creating a tartan pattern for a bedroom. Little did I know that this would be the process that I eventually adapted for my production of my tartan texture.


As you can see above is the model fully unwrapped and textured. Its been a long week but bring on the next one. On to rigging see you next week.
Chris Anka Web Developer

Morbi aliquam fringilla nisl. Pellentesque eleifend condimentum tellus, vel vulputate tortor malesuada sit amet. Aliquam vel vestibulum metus. Aenean ut mi aucto.

Sunday, 15 February 2015

Week 20


The character project continues and we now delve into the 3d stage of the character. Modelling the person and then breathe life into them via rigging. Admittedly this is something that I have been very worried about if not dreading to get into. As I am quite the perfectionist so I am bound to put off new challenges out of fear of failure. This was quite evident this week as in the beginning of the week I promised myself I would work on modelling  a base mesh for my character my goal was to get this done by the end of Monday. Long story short I didn’t. I didn’t even start until about 4 o’clock in the afternoon. Instead I put it off and directed my attention to working on my 2d art and produce a final concept for my character.

Although I'm quite happy with the outcome of this concept I am not happy with my work ethic. It was clear that I was using this so called final concept as a way of procrastinating; doing something I’m quite comfortable to feel as if I am doing something productive when in fact I’m spending hours on something which shouldn’t take me as long and I’m doing it for the sole reason of putting of something I’m scared to do.


In terms of the overall proportions of the final concept things seem to be alright, the model should be roughly 7.5 heads tall and the proportions in relation to each other should be quite solid as I was constantly iterating the pose and getting outsiders to view anything that was funny about the concept. My only problems with the render is that the right arm appears to look quite flat from the way I have rendered the arm. I should have really pushed the curvature of the form similar to how I did with the left arm. Moreover what needs to be fixed would be the colour palette. From what I have learnt from my colour mood board, to effectively convey a warm colour palette I have seen that some artists balance a warm and cold palette with the use of subtle cold palettes to push the warm colours towards our eyes. I feel that the colours vie used in this concept are too desaturated and don’t meet with the style guide of a warm feeling.


 Hence to resolve this issue I added more blue accents in my concept and added a few oranges so that the contrast between the two will push the orange towards viewer’s eyes and really convey a warmer tone. 


Finished head for model, middle base mesh, left old base mesh
When I did get to the modelling of my 3D model quite surprisingly I found it somewhat enjoyable; modelling the base mesh. 3D has always been something I have struggled with but the duration of the course has given me skills in which now when faced with a problem of 3D I can somewhat find a solution without throwing a temper tantrum.

I believe it took me the rest of the day to model a base mesh however I wasn't happy with the result especially the topology of the form so as a result I reiterated and modeled a new one. I felt that my old model would have problems deforming when rigging so as a result I looked up limb topology edge flows and attempted to reflect that in my work. Looking back at my workflow compared to how I worked when I started the course I truly have become comfortable modelling within reason. So much so I worked on both my orthos and my base mesh dual screen listening to the citizen cane of bad movies, The Room. It truly was an enjoyable experience however I hope by doing so it doesn't take away from the quality of my final model. We will see in the coming weeks.
Finally this week in critical studies we were tasked to print out our progress in both our blogs and character project. I felt that this task was very useful as it got me to understand what I was doing well but most importantly what I was doing wrong.

Blog
-grammar problems

Visual design
-work less loose; things are too noisy

Moreover I also received a point of reference to understand the point of register I should apply to my blog. Before coming onto the course I was familiar with writing blog posts however they were very formal and essay based. This has always been something I have struggled with when writing posts handling a formal attitude without conveying a robotic sense of writing to my work. During this critical studies I was given a strong idea as to how I should go about constructing my posts and in the near future I hope to push my writing towards said format.


Chris Anka Web Developer

Morbi aliquam fringilla nisl. Pellentesque eleifend condimentum tellus, vel vulputate tortor malesuada sit amet. Aliquam vel vestibulum metus. Aenean ut mi aucto.

Sunday, 8 February 2015

week 19


This week, in terms of formal sessions the course felt quite empty, there was no game production lesson or critical studies. Although this opened up this week for me to concentrate on my character iterations I did feel as if I would’ve possible liked some sort of session on developing good topology. This is something that I have struggled with in the past and I would’ve loved to attend a formal lecture on topology.

Visual Design

In visual design our characters were reviewed by our tutors to keep us on the right track. My feedback for my character was quite positive however I was told that my character didn’t meet the style guide constraints. My character being a moor barber surgeon his aesthetic is quite northern African however it is clear that the village is more European than Middle Eastern. How my tutor best described it was say if I was in industry and I was asked to design a medieval character and I was to hand them my Moorish character although he is in fact from medieval period he doesn’t quite communicate the stereotypical look of medieval clothing which audiences would understand. Understandably I comprehend what my tutors are saying although I wasn’t pleased that this wasn’t mentioned in the style guide; what I’m referring to is the time frame of what medieval is and what region of medieval culture we were attempting to depict. I wanted to try and think outside of the box with this project and produce an interesting character whilst also making it personal in the sense of my cultural background being from Africa. However this I believe will not be the case for this project. Perhaps another project in the future I could possibly attempt to execute this initial idea.
As a result of this I decided to redesign my character as a Scottish barber surgeon, to keep the drapery and the silhouette of my previous design and push it with more of a highlander look.

Below is my progression of the character so far.


Mood board part 1
Mood board part 2

Head anatomy research

More anatomy research

Sketches of people around Leicester

Quick doodle to get an idea as to what I may want (step taken before thumbnail sketches)

Moodboard part 2

moor digital sketch (understanding moor clothing)

Quick thumbnail sketches (moor character)
character paintover and some silhouette study

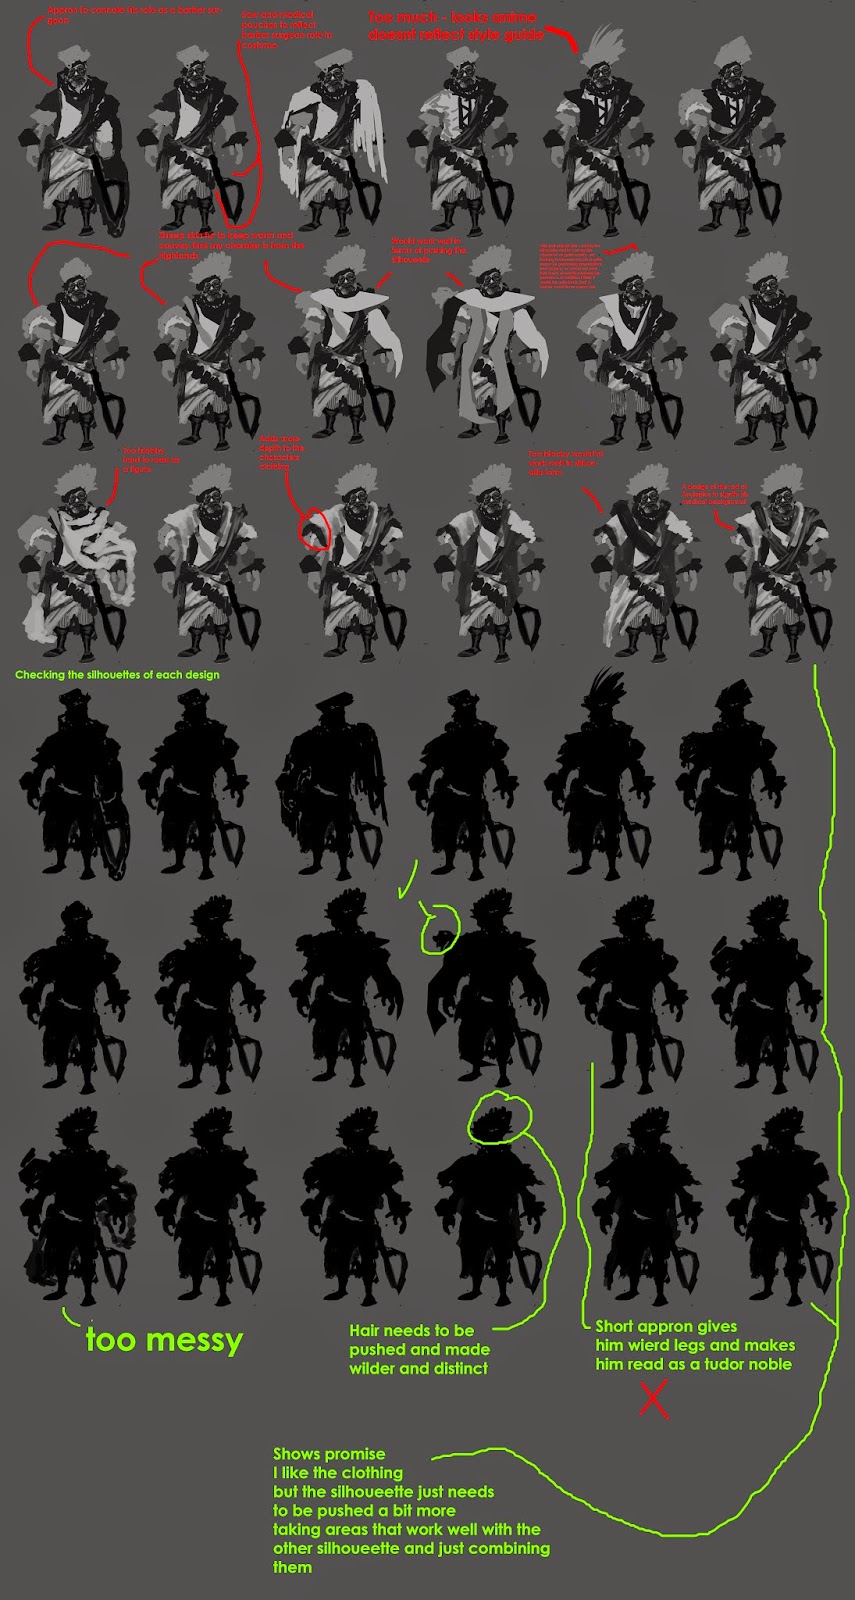
Silhouettes

silhouettes part 2 (moor)

Head concepts and aged face

Head concepts 

head concepts part 2

Moodboard  Part 3 - exploring colour and developing my character
as a scotts man

Starting anew - Redesigning the moor into a scott

Colour swatches for character

Scottish Barber surgeon character
Value iterations

 Orthographics for character

saw accessory - orthographic

Colour block in 

Chris Anka Web Developer

Morbi aliquam fringilla nisl. Pellentesque eleifend condimentum tellus, vel vulputate tortor malesuada sit amet. Aliquam vel vestibulum metus. Aenean ut mi aucto.

Sunday, 1 February 2015

week 18


As the character project progresses we start to delve into the concepting stage of our project. However before we actually start concepting, in visual design we were given a lesson on how to make strong moodboards. From attending this session I started to see how weak my moodboards were as compared to what they should be in fact. Below is an image of one of my earliest moodboards on the course.
As you can tell above there is no annotation to suggest where I am going or what in fact I want to design. In addition there is little organisation with my images as one can see that there are images of Celtic artwork scattered around and mixed in with images of rocks. From this session of moodboard design in visual design I had learnt that essentially a moodboard needs to communicate where I am going and what is it I am attempting to produce. This should as a result produce a stronger idea for what I am designing as I get more involved with the images I am taking reference from and start to understand each of the traits I would like to use to produce my concept. Below is my moodboard for the current character project.

As you can see it’s larger in scale, it’s broken up into sections to organise the layout better as well as to allow me a sense of ease of access when scrolling through. This will allow me to pick up areas that I find interesting and strong and use them as inspiration for my paintovers and photobashes. Moreover there is annotation for me to get my ideas on paper and for me to refer to in the future if say I go off tangent with what I am attempting to accomplish. Comparing these two moodboards together I feel reflects my progression on the course, I would like to say I have started to become more detailed and open in my approach to designing concepts as you can see in my paintovers I have produced this week.


During the paintovers I produced paintovers of myself older using what I have learnt
from studying facial anatomy to aid my rendering
In addition to moodboards this week Mike elaborated on producing paintovers and photobashes. Using the orthographics we took of ourselves last week I produced a range of paintovers for my character. Essentially I wanted to develop a Moorish barber surgeon type character. To reflect this in my character I made a second moodboard consisting of Moorish clothing and barber surgeon accessories and attempted to mash them together in my design. This way it should communicate to audiences that one my character is a moor but also my character has a medical background.

Whilst I was producing these designs I started to notice that the silhouette of my designs weren’t particularly strong. As a result of this I added a black colour overlay onto the paintovers to make into a silhouette and then work into them producing a stronger design. I quite enjoyed producing these paintover concepts, they opened my eyes to how efficient and quick it is to create a readable design.


Game production

This week there was no formal game production lesson instead our tutor came over to check up on how we are doing as well as give us a brief introduction to limb deformation. I was quite disappointed that our tutor didn’t spend time to elaborate on how we could achieve good limb deformation in our models as this is not an area we have practised and seeing as we are to rig our models admittedly I am quite scared. However I think I should get stuck in make mistakes and learn from them.

Critical studies
Just like game production there was no formal lecture/seminar however instead we were treated to a guest lecture by DMUGA alumni who have gone on to work in the field. I really do feel as if I have benefitted from attending this lecture. It put some things in perspective namely how to improve and do well on the course. One thing I really took from this lecture was that it’s okay to make mistakes because particularly with 3d we are just starting out as I think Del said it (one of our guest lecturers) there’s no way we can be good if we are just starting out, we have loads of time to get better.
This statement is something that I’m going to take in account when approaching future projects.

Chris Anka Web Developer

Morbi aliquam fringilla nisl. Pellentesque eleifend condimentum tellus, vel vulputate tortor malesuada sit amet. Aliquam vel vestibulum metus. Aenean ut mi aucto.